

A work colleague was telling me a story about taking care of the worm farm while her flatmate was away. A story of finely chopped food, frozen and defrosted to the right temperature so as not to harm the worms with a carefully measured jug of water at the right temperature added at the exact right time. Huh? I could hear the voice of my Pop, (a lifelong avid gardener and Warragul show vegetable growing prize winner) ridiculing the hipster worm farm craze.
“Don’t be ridiculous. They’re worms… you just throw the scraps in with some dirt then they eat and shit and ya get compost”
Apparently this room mate hasn’t met anyone like my Pop.
But the idea of a worm farm on a deck in an inner city apartment sounded so logical that I started research right away. Obviously a composting ecosystem in a small space is going to differ from my Pop’s vege patch and chook pen with the abundance of worms, where almost every household scrap ended up – animal, vegetable or mineral. It seemed logical that I’d need to be a little more careful with the acidity of the space, and that it wouldn’t be able to consume the volume of scraps of an outdoor garden. Onions, garlic, meat, egg shells… anything with maggot eggs or cooked food isn’t going to work in the confined space, and will lead to… a mess.
Ideally I wanted a pink worm farm, but the limited edition Vermihut in pink had sold out before I’d found the website. Impatiently, I visited a Bunnings and bought the 2 tier “can of worms” ($70AUD), a block of Coir Fibre ($8AUD) and a box of 1000 worms ($50). I’ve generally been happy with this as a starting option, but after 8 months I’m ready to expand to another farm – this time a Vermihut ($100) in purple or green because colour is important.
Here’s some key points to know before you get started:
Establishing
Don’t have high expectations right away. Your farm will take at least 2 months to get properly established, and to start consuming any reasonable amount of scraps. Worms eat about half their body weight each day apparently, but if there’s only 1000 worms that’s not much. If your worm farm comes with any card packaging, the instructions will tell you to line your farm with this or break it up for the worms to eat, and it’s a good idea to regularly add card or newspaper to assist with the ecosystem of the worm farm.
Here’s a really simple video showing how to setup your worm farm, with a green Vermihut as the example.
Scrap Preparation
There are many ways to feed scraps. Chopping finely helps it to break down quicker, but I think if you find yourself pulping the scraps in a blender on a Saturday night to put a smoothie in the farm so it’s nice and easy for the worms to slurp, you need to have a chat with my Pop. Sure, smaller bits might make for more edges for worms to suck on with their tiny little mouths, but a worm can suck it’s way through an apple so we really don’t need to make smoothies. I intentionally leave some scraps whole to allow for breeding.
The Whole Banana Experiment
I’d noticed that pumpkin skins or anything sweet and soft attracted the worms, so I thought I’d try some of many banana skins left over from my daily smoothie. The worms loved it, and regularly babies appeared under the skins, a safe space for them to fill up on sugar and grow! I had a whole banana that went soft one day, so I thought I’d see how long it took to break down. By week 3, it wasn’t recognizable. Here’s week 1 and 2…
Week 1 – Whole Banana Experiment
Week 2 – Whole Banana Experiment
Breeding
The worms start breeding as soon as the farm is settled, and you will regularly find babies under banana skins or avocado skins. While these take a long time to break down, they provide a shelter for eggs to hatch and an immediate food source. I’ve experimented with a whole banana which broke down after about 6 weeks but led to such a breeding frenzy that I intend to start a second farm soon. After 8 months, I am yet to recount the worms in the farm but I estimate they have increased at least 5 fold since I started with 1000.
Here’s a video of some of my baby worms which I have managed to capture on camera, despite these being about 1-4mm long.
Maggots
If you leave your scraps out so flies lay eggs in them, you will get maggots in your farm and these can take over if you’re not careful. It’s not that bad, but indicates that your farm is too wet and has too much fruit or other acidic rotting scraps – an environment that is not good for the worms in the long run. I recently put some corn in the farm which had been on the bench for a few days and got the nasty surprise when I opened the farm a week later. The maggots had made homes in the rows of corn and looked like some alien species about to invade New York to pave the way for their alien overlords to take over earth. I removed the corn, and added some newspaper and dry dirt to the farm (thanks Google and all the bloggers for the trouble shooting advice) and have noticed a few very sick or dead maggots in the farm in the week since. I have a bird friend who has injured both of its feet, and regularly visits my deck for water and bugs. Fortunately it likes maggots because that was almost enough to make me want to give up worm farming. Why are maggots so gross but worms so cute?
The Worm Blanket
So… i’ve seen these for sale for upwards of $20. It’s a bit of cloth to keep the bugs out and moisture in that gets covered in dirt and worm shit, not a designer fashion accessory. I cut up a hessian sack to a circle shape, with an extra for the top to put a plant on. This disintegrated eventually after 6 months so I cut up another one. It just needs to be thick and shaped to the farm, so look around the house before you buy anything new. Worm farms are a great way to be better to the planet in our own little space, so see what else can be recycled like old sheets or pillow cases, jeans, tablecloths etc.
Potting Mix
One of the most frustrating thing about being plant obsessed in the city is the crappy quality potting mix we lug up 2 flights of stairs only to have the plants suck up the nutrients in weeks leaving bark and other wood chips behind – useless! I regularly took loads of soil down to the shared garden space, dumping under trees while purchasing endless new bags of soil. Now that I have a worm farm, I cycle the dirt regularly. Old dirt is in a bucket next to the worm farm, a few handfuls sprinkled in with every scrap feed or if it gets too moist. Every few months I remove the bottom layer and use the mountain method to separate worms from castings.
Worm Castings
The castings are the poo and broken down scraps and old dirt which can be used to fertilize your plants. I have done the separation process twice in 8 months but should have probably done this more regularly. This involves tipping out the bottom layer on to a work bench, newspaper or an old sheet on the deck and shaping it in to a mountain. The worms will crawl inside, leaving worm free castings on the top and around some edges. Take off the top, set it aside and wait for the worms to crawl away from the light. Repeat shaping the pyramid and taking away the top until you’re left with a wriggling pile of worms that can go back in to the top layer of the worm farm.
Rotating
Now you can take your empty tray after removing castings and place this on top of the other tray, which is likely to still have some scraps left. Add a few sheets of newspaper and card to the top tray, and about 20% of the content of the bottom tray – careful not to disturb babies! Put the worms back in, top with the worm blanket and leave for a few days for the worms to establish their home again. Add new scraps to the top after a few days, and check again in a week before adding any new scraps. You should notice worms migrating back to the top and can start to add scraps again every few days provided they are consuming them.
Worm Tea
Look… there’s nothing wrong with water that’s got some of the run off in it… it has to have some nutrients in it that plants love. But i’ve seen folks selling this for $2 a litre as a miracle fertilizer which is about as truthful as John Edwards powers being psychic. The worm tea is produced when water is flushed through the farm. About once a week, 1 to 2 litres of fresh water should be poured over the top of the worm farm. This will run through the farm, taking with it some of the dirt and nutrients. Turn on the tap at the bottom of your worm farm and catch the coloured water. Bottle it or use a bucket to pour on to garden or pot plants.

Worm tea. Basically just dirt coloured water.
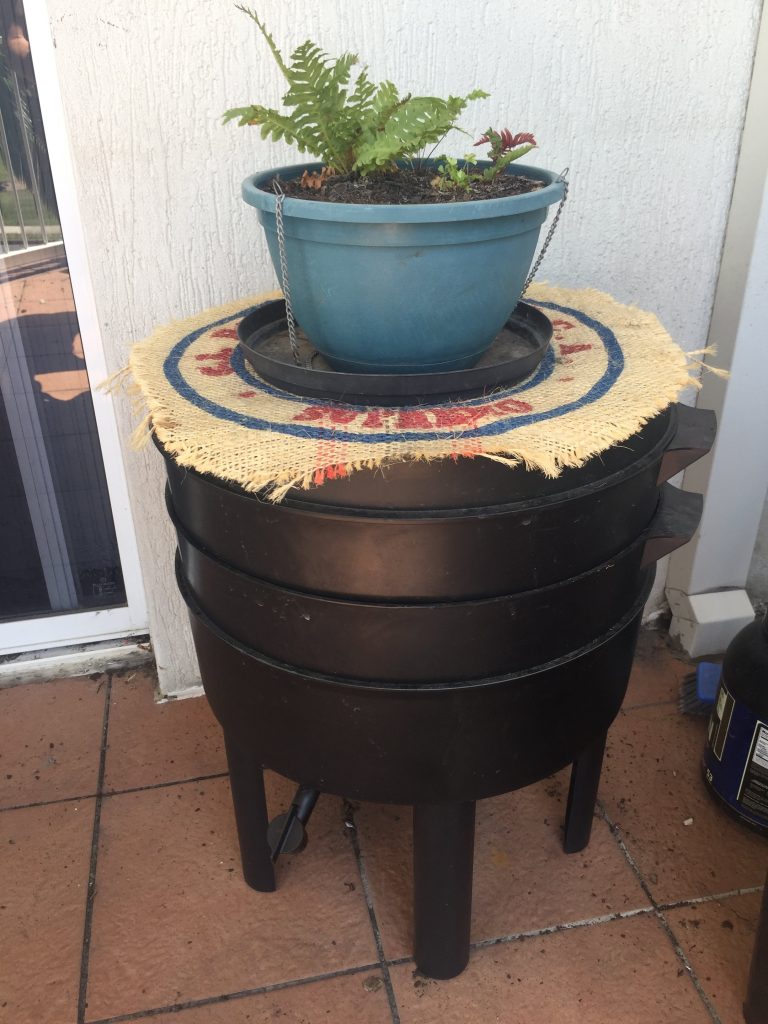
Bucket’o’worms discretely sits in the corner with a plant on it!

Handful of worms